Original Link: https://www.anandtech.com/show/6089/asrock-z77-extreme6-review-legacy-bites-back
ASRock Z77 Extreme6 Review: Legacy Bites Back
by Ian Cutress on July 13, 2012 2:00 PM EST- Posted in
- ASRock
- Motherboards
- Z77
ASRock are not afraid of the legacy connections. Not merely content on having both a floppy drive header and an IDE connector on the Fatal1ty Z77 Professional, they have also put a floppy header on the Z77 Extreme6. There is reason for this, given that industrial equipment can cost $millions and a shiny new PC to process the data costs a lot less, even if they can only communicate via Floppy. Today we are looking at the performance and package that comes with the Z77 Extreme6, and see if it holds up with its price tag against the vast array of Z77 motherboards currently on the market.
ASRock Z77 Extreme6 Overview
Performance is an odd test on a motherboard for the most part. Every major facet of the motherboard is often in the control of something else - the CPU takes care of computation, the RAM looks after local data management, the chipset for IO, and audio for audio. The motherboard is merely the collection of controllers collated with design, with a vendor specific flair of aesthetics and software on top. So why test the performance?
More often than not, in each of the circumstances listed above, the motherboard comes in as the second most important feature. The routing between two components will determine the latency, or the decision to use one port per controller rather than two may influence throughput. These differences do not show up significantly during testing (CPU tests, for example) unless the motherboard becomes the limiting factor in some regard. This is why we try to test with the best CPU, the best memory, and so on. However, areas such as the DPC Latency (how the CPU and chipset deal with requests) are governed by the BIOS, something that the motherboard directly influences.
Thus, if a motherboard happened to perform near the bottom in the majority of the tests is quite alarming - somehow, the board has a flaw at some level. What if the difference between the board and the second from bottom board was very slight every time, coming in at less than 1%? How would we analyze such a product? Would it be bad?
Unfortunately, this is where the Z77 Extreme6 fits in many of our tests. It lacks the MultiCore Enhancement that both ASUS and Gigabyte apply to their boards for extra MHz at full loading, as well as long-term stability with my standard G.Skill DDR3-2400 testing kit.
This is not a concern if you run an overclock though, as the Z77 Extreme6 board overclocks the CPU quite well, reaching 4.7 GHz on our test chip with 1.175 volts in the BIOS and only 82ºC during OCCT.
Software wise, ASRock has paired the Extreme6 with their normal feature set plus a couple of bonuses for Z77 - namely their Online Management Guard facility and 'Dehumidifier Function'. These two lack significant substance by being only BIOS based utilities though - ideally, a software implementation would be preferred.
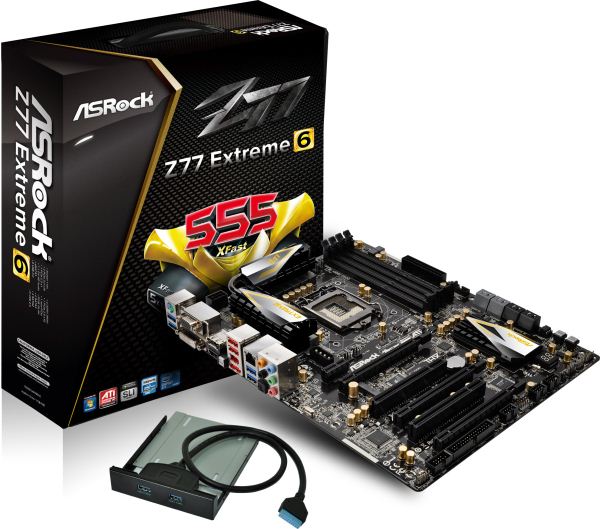
For the price, we get ASRock's great little USB 3.0 bracket in the box, as well as a complete set of video outputs on the IO. As a sneaky little addition as well, users can put in three AMD GPUs for 3-way CFX, if you do not mind the third card limited to x4 PCIe 2.0 coming from the chipset (analyzed later in the review). This does away with the need for a PLX PXE 8747 chip on board, which would have increased the price by another $30 or so.
The ASRock Z77 Extreme6 is a capable motherboard for most usage scenarios. Just add some nice DDR3-2133 memory and apply a CPU overclock. However, it lacks some substance and a spark over other major motherboard manufacturers.
Visual Inspection
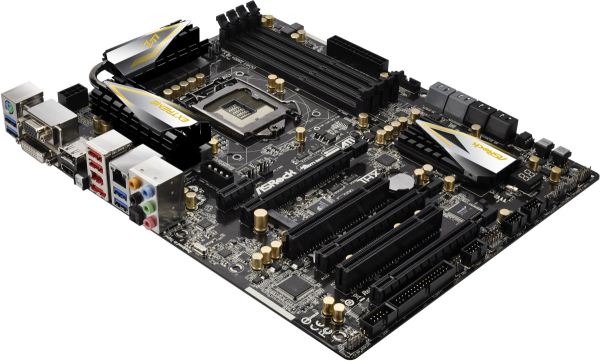
With the Z77 Extreme6, compared to the Z77 Extreme4, there are a significant number of changes, both visual and in terms of features. For a start, the heatsink design is more pronounced, using something similar to their X79 range in terms of black and gold ridged and edged surfaces.
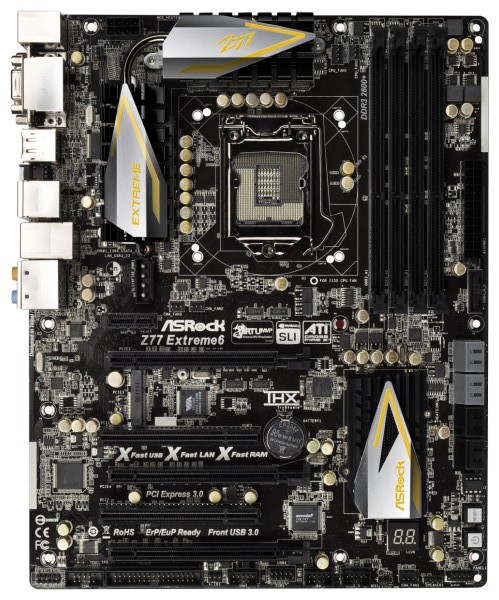
Onboard is also an mSATA port, right in the middle between the first PCIe slot and the PCI slot. Above the PCIe slots is a 4-pin molex power connector to provide extra power to the PCIe slots, although I am kind of getting tired of seeing it put in this location. If anything, it should be at the bottom end or beside the 24-pin power connector, as having it above the PCIe slots just means that there will be cables all over the place.
One other less obvious change to the Z77 Extreme4 is that there is a Floppy drive header on board. Yes, you heard me right – floppy drive! It seems odd now to include this legacy connection. It still has a place in industrial concepts (where a machine uses floppy drives and costs 1000x more than the PC processing its data), but not particularly on a higher end product which may be geared towards gaming and overclocking. As ASRock seem to be the only manufacturer pursuing this path on their consumer line, then it creates a niche just for them.
In terms of fan headers on board, we have one three-pin beside the 8-pin 12V power connector, two CPU headers (one 4-pin, one 3-pin) just to the right of the top heatsink, two chassis three-pin headers beside the molex connector, and another 4-pin chassis header on the bottom of the board. On the right hand side, the USB 3.0 connector has been placed beneath the 24-pin ATX power connector, followed by the SATA ports. Like the Extreme4, we have the PCH SATA ports (two SATA 6 Gbps and four SATA 3 Gbps) and two extra SATA 6 Gbps from an ASMedia ASM1061 controller.
Around the larger chipset heatsink, we have power/reset buttons and a two digit debug display, both of which I personally like to see as a reviewer (makes my job a bit easier) but also helps overclockers. On the south side of the board, apart from that floppy connector I mentioned, we have a COM port, front panel audio, and an array of USB 2.0 headers.
PCIe layout is similar to the Z77 Extreme4, with a PCIe x1, PCIe 3.0 x16/x8, an mSATA connector, PCI, PCIe 3.0 x8, PCI, and a PCI 2.0 x4. This allows a user to use a dual GPU setup, and still have access to a PCIe x1 and x4.

Aside from the bowed picture from ASRock, we have something similar to the Extreme4 for the IO back panel, though this time with a DisplayPort output. From left to right, we have a combination PS/2 port, two USB 3.0 ports (blue), a D-Sub port, DVI-D, DisplayPort, HDMI, a ClearCMOS button, two USB 2.0 (red), an IEEE1394 port, eSATA, gigabit Ethernet, two more USB 3.0 (blue), and audio outputs including an optical SPDIF.
Board Features
| ASRock Z77 Extreme6 | |
| Price | Link |
| Size | ATX |
| CPU Interface | LGA-1155 |
| Chipset | Intel Z77 |
| Memory Slots |
Four DDR3 DIMM slots supporting up to 32 GB Up to Dual Channel, 1066-2800 MHz |
| Video Outputs | DisplayPort, HDMI 1.4a, DVI-D, D-Sub |
| Onboard LAN | Broadcom BCM57781 |
| Onboard Audio | Realtek ALC898 |
| Expansion Slots |
2 x PCIe x16 Gen3 (x16, x8/8) 1 x PCIe x16 Gen2 (x4) 1 x PCIe x1 Gen2 2 x PCI 1 x mini PCIe |
| Onboard SATA/RAID |
2 x SATA 6 Gbps (PCH), Support for RAID 0, 1, 5, 10 2 x SATA 6 Gbps (ASMedia ASM1061) 4 x SATA 3 Gbps (PCH), Support for RAID 0, 1, 5, 10 |
| USB |
Two USB 3.0 at rear (PCH) Two USB 3.0 at rear (Etron EJ168A) One USB 3.0 header (PCH) |
| Onboard |
4 x SATA 6 Gbps 4 x SATA 3 Gbps 1 x Floppy Connector 1 x IR Header 1 x CIR Header 1 x COM Header 1 x SPDIF Header 1 x 4-pin Molex power connector Power/Reset Buttons Two Digit Debug LED 6 x Fan Headers Front panel audio connector 3 x USB 2.0 headers (support 6 USB 2.0 ports) 1 x USB 3.0 header (supports 2 USB 3.0 ports) |
| Power Connectors |
1 x 24-pin ATX connector 1 x 8-pin 12V connector 1 x 4-pin Molex for PCIe |
| Fan Headers |
2 x CPU Fan Header (one 4-pin, one 3-pin) 3 x CHA Fan Headers (one 4-pin, two 3-pin) 1 x SYS Fan Header (one 3-pin) |
| IO Panel |
1 x Combo PS/2 Port 1 x DisplayPort 1 x HDMI 1.4a 1 x DVI-D 1 x D-Sub 1 x Optical SPDIF 2 x USB 2.0 4 x USB 3.0 1 x IEEE1394 1 x Gigabit Ethernet 1 x Clear CMOS Audio Outputs |
| Warranty Period | 3 years from date of purchase |
| Product Page | Link |
Nothing immediately jumps out from the board features list aside from the differences to the Z77 Extreme4. This is a quite good package for an MSRP of $175.
ASRock Z77 Extreme6 BIOS
The BIOS is the central nervous system of the computer - it decides where signals between all the different components should go (in this analogy, the CPU is the muscles, the RAM is the brain, the GPU is the visual cortex, I have no idea what the liver or gall bladder would be...). It is a very important part of the whole package, so the BIOS must be coded properly and loved by the manufacturer. It should be simple enough to make it easy for users but also offer the level of complexity that enthusiasts would want.
We briefly tackled ASRock's BIOS when we looked at the Z77 Extreme4 - in comparison, there are a few nuances with the Z77 Extreme6 that I should mention here. My normal BIOS policy when getting a board in for review comes in two forms. If I received the motherboard before release, when it comes around to reviewing I will update to the latest publicly available BIOS at the time; if I receive the board after the chipset has some footing in the market, I will review it as-it-comes.
My sample from ASRock was on a very early 1.01 beta BIOS, so I upgraded it to 1.70. This version comes with some extra features (Internet Flash, Dehumidifier) which I will mention later. The original BIOS, should you have it, it worth updating - the early revisions were slightly unstable and would hang from time to time.
Neither BIOS was entirely happy with my memory choice - my kit for Ivy Bridge reviews is a G.Skill 16GB DDR3-2400 9-11-11 kit (F3-19200CL9Q-16GBZMD), which works in most Z77 motherboards without an issue. With a few motherboards, I have to raise VTT from automatic to 1.3 volts. I had to do that with the Z77 Extreme6, but even then the system would fail to boot or BSOD every now and again. All the testing was complete at XMP for this kit, albeit in batches when it was working.
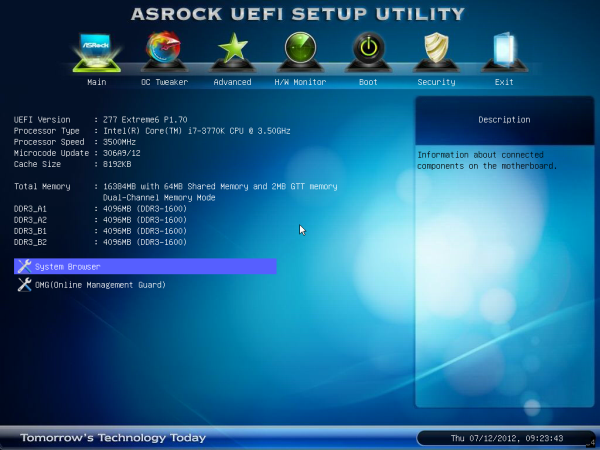
The BIOS itself in terms of features is a packed as the Z77 Extreme4. Our front screen gives us a lot of information that we like to see from a BIOS - the motherboard being used and the BIOS version; the CPU and CPU speed; the total memory on board, as well as a break down per memory stick and current speed of those modules. All we are really missing is some form of persistent temperature value present on the screen, and perhaps some voltage readings.
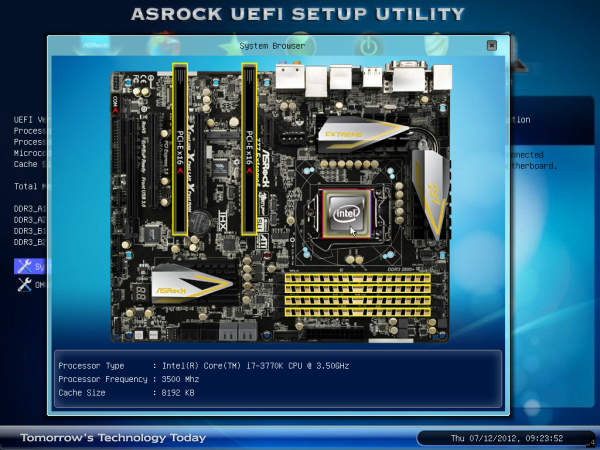
On this front screen are two additional features that do not really fit into the rest of the BIOS. The first is the system browser, which is a top down image of the board installed with all the components inside it identifiable. This is handy if some hardware is not being seen - if it is not here in the system browser then chances are the operating system will not initialize it (i.e. a memory stick or 2nd GPU dies).
The other feature on the main screen is the Online Management Guard, or 'OMG'. The premise of this comes down to disabling the internet features of a motherboard for certain times of the day to restrict access for younger users. There are several easy ways for those users to disable it however - either by changing the system clock, or by going into the BIOS and changing it manually. There is also the possibility that using a WiFi dongle would get around this, as the BIOS can only control the network port on the motherboard.
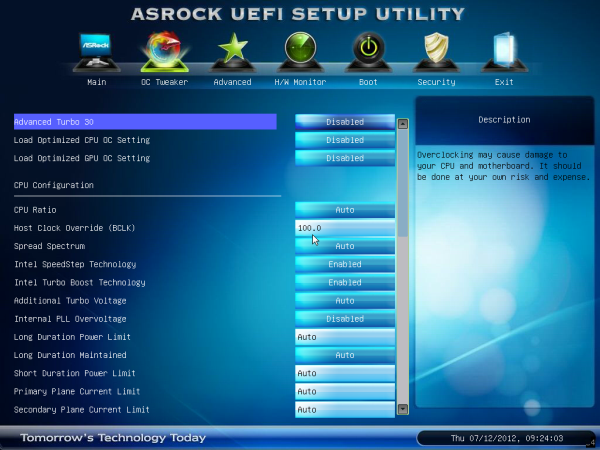
The main section of the BIOS is in the OC Tweaker menu, which deals with overclocking. For automatic overclocks, we have the Advanced Turbo 30 option that gives a 4.7 GHz overclock on the system, and CPU OC/GPU OC settings that give predefined values for each value to reach desired overclocks. These will be tested in the next page of the review.
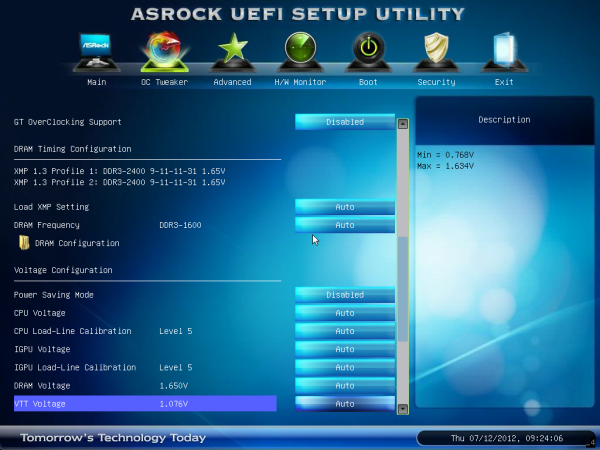
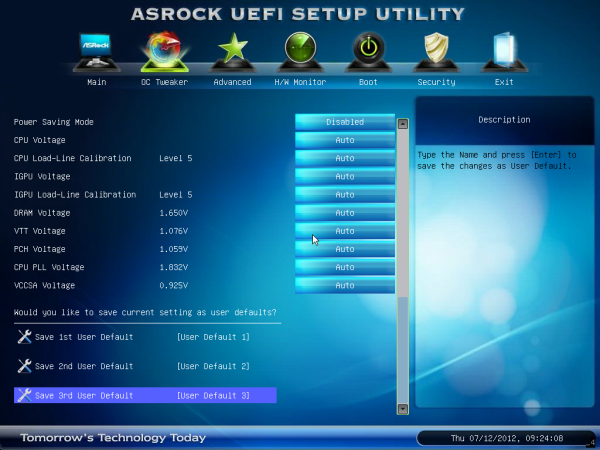
The rest of the OC Tweaker menu is standard. CPU Ratio can be selected per core or for all cores, and BCLK can be adjusted appropriately. Adjusting the BCLK also directly affects the value chosen for the memory strap, which is always good to see. Power limits and turbo boost options are also here. Memory settings are found under the CPU settings, and voltage settings are underneath that. Thankfully, ASRock are nice and thorough on describing each of the features, especially the Load Line Calibration - sometimes it is never clear if LLC Level 1 or Level 5/10 is the optimal setting for constant voltage, but ASRock provide a handy diagram for users. Three profiles can also be saved.
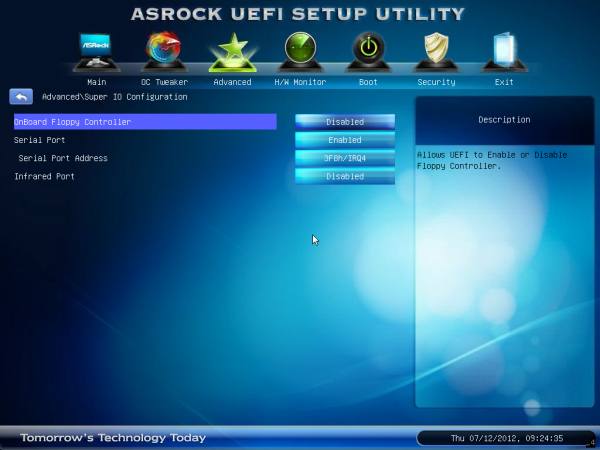
By default, ACHI is enabled (a good setting), and the onboard Floppy port is disabled. Users can enable the Floppy port by going to Advanced -> Super IO Configuration as shown below.
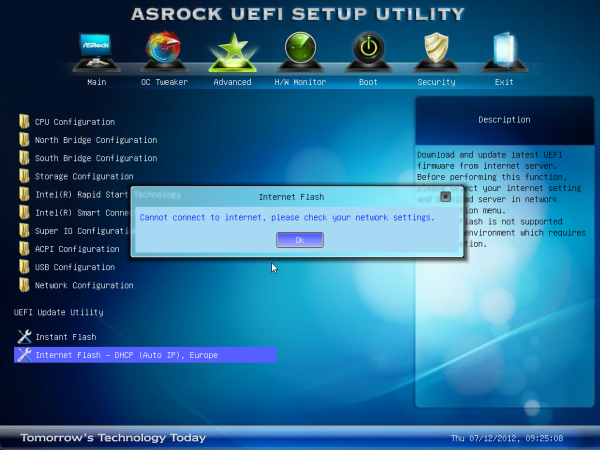
In order to update the BIOS, ASRock have an option to flash from a USB stick whilst in the BIOS (nothing new there), but also a novel feature called Internet Flash. Part of their BIOS code contains networking protocols such that users who have a non-login wired internet connection can directly probe ASRock's servers and download the latest BIOS. My testbed setup uses an esoteric combination of WiFi and ICS, and thus this was not applicable in my usage scenario. However, it is a great feature to have in a BIOS, and I fully expect other motherboard manufacturers to copy this.
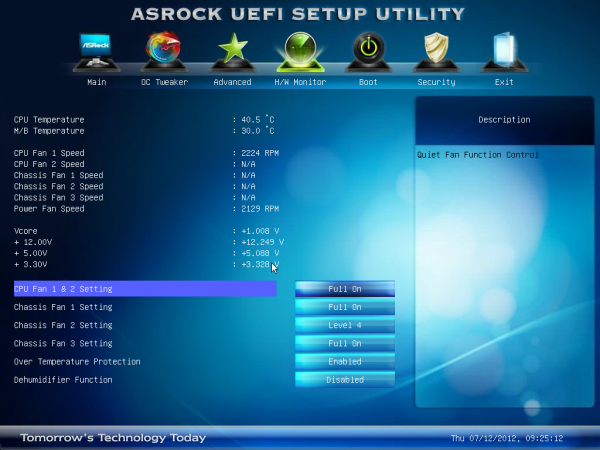
Fan controls from ASRock have been in the past a little confusing and disappointing in the past. While some of ASRock's competition allow users to specify a gradient between minimum and maximum RPM of a fan on a header, ASRock relies on using 'Target Temperatures' and 'Target Speeds', which use various levels to describe the ferocity of the fan. This is not an ideal situation if it requires users to try to understand how it works. The interface should be clean and easily selectable.
ASRock's last surprise comes in the form of their 'Dehumidifier' function. This is a very odd feature, especially as it is inappropriately named for the western hemisphere, where dehumidification has only one specific meaning of actually taking water out of the air. Let me take you through the ASRock usage scenario:
You have a PC in a very humid climate, where humidity is in the high 90%. When you use the PC for gaming, the temperature inside the case rises. As air gets warmer, it can hold more water.
Therefore, if we have (for example) 4 grams of water in a case at 40ºC, the specific humidity of that air is greater than a situation where we have 4g of water in a case at 60ºC. But at 60ºC, the air can hold more water (say 6g). When the PC is turned off, or the localized air gets cooler, the air inside the case can get cooler, and when the air reaches 100% specific humidity, the water vapor leaves the air and condenses on components. ASRock's Dehumidifier function makes the PC spin up the fans for a periods of time during the day to remove the hot air that has accumulated during the day from the case, and replace it with cooler air, but at the same time the hot air takes away the extra water vapor with it.
It can get confusing as well if you consider where the extra water vapor would come from. Scientifically, it deals with the balancing of specific humidity across two adjacent temperature zones. Using arbitrary numbers, consider two pockets of air close to each other. Each holding 2g of water vapor (so 4g total), but the first pocket of air (A) is at 40ºC, with a specific humidity of 100%. The second pocket of air (B) is at 80ºC, with a specific humidity of 50%. The water vapor will migrate from A to B, in order to balance the specific humidity. This would mean that in the end, A would still be 40ºC (assuming no heat transfer), but hold 1g of water with a specific humidity of 75%, and B would still be 80ºC, but hold 3g of water with a specific humidity of 75%.
If suddenly the temperature of B dropped to 40ºC, then 1g of water would condense out of the air, leaving it with 2g of water (specific humidity of 100%). This is the scenario ASRock are hoping to avoid with the 'Dehumidifier' function. Perhaps 'Dehumidifier' is the wrong thing to call it, but it is there if this is your scenario.
(For completeness, A and B would again equilibrate to 87.5% relative humidity (1.5g of water each) at 40ºC. There is then the possibility that they would reabsorb some of the condensed water back until none was left. Please note I was using arbitrary numbers to showcase a point, rather than exact calculated values for a given volume)
Software
ASRock love to include licensed software in their motherboard bundles. Their main marketing feature is the '555 XFast' motif, covering XFast LAN (licensed software), XFast USB (licensed software), and XFast RAM. Each of these will be covered in turn. But first, let us start with the ASRock eXtreme Tuning Utility, or AXTU.
ASRock eXtreme Tuning Utility
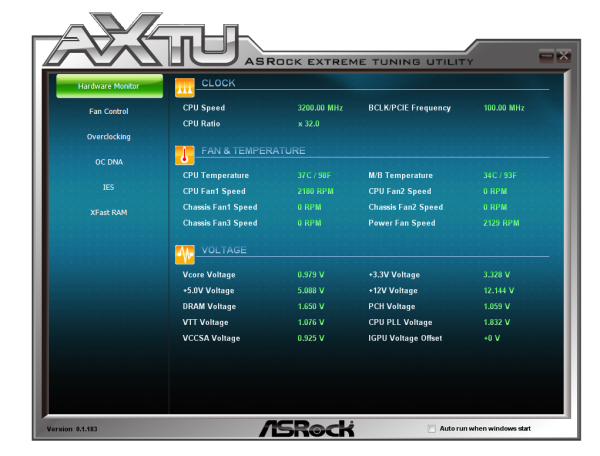
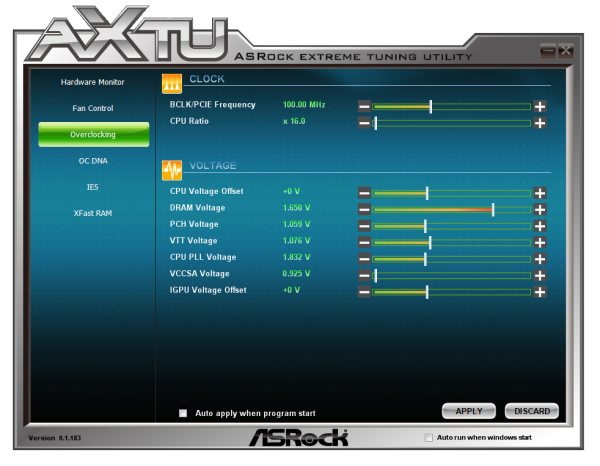
AXTU has been part of the ASRock bundle for a while now. It attempts to emulate to a certain extent ASUS' AI Suite, in the sense that it should have all the motherboard features in one interface. ASUS' design has been refined over the years, while ASRock's remains simple:
Options include the hardware monitor, fan controls, overclocking, OC DNA (for sharing BIOSes), IES (Intelligent Energy Saver), and XFast RAM. The hardware monitor is as you see above - we have access to a lot of data for the CPU, voltages, temperatures, and fan speeds. A lot of this would be a good inclusion on the first BIOS page (hint hint).
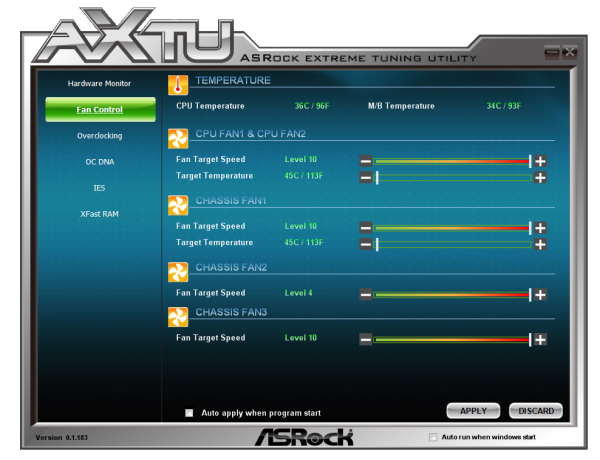
The fan control settings are easier to manipulate than those in the BIOS, however there is scope to improve the visual aspects of this interface with graphs and so on.
Overclocking options on the other hand are a little tame, giving no direct control for inputting values - everything is done on the sliders. The voltages are a little confusing, as it shows neither the current values set by the BIOS nor the current values as per the CPU load. Giving users only an offset voltage to play with is a little frustrating.
The Intelligent Energy Saver function attempts to reduce the voltage on the CPU as well as the number of power phases in use at any one time.
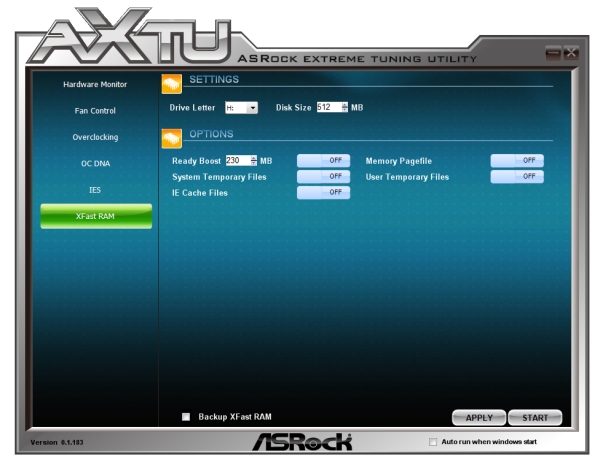
XFast RAM is a feature ASRock are using to help speed up certain features of the motherboard. ASRock recognize that users of Z77 motherboards can pick up memory very cheaply, so it would be common enough to see 16 GB of memory in a system. Even as an enthusiast, I have only ever seen my 16 GB system hit 8 GB a single time and that whilst playing a game and having 100s of internet tabs open at once. Thus ASRock have said that it would be worthwhile donating part of that memory into a RAMDisk, which acts as a fast store for temporary files.
Users can thus partition off part of their memory to deal with temporary cache files as required. Reading from the memory is a couple of orders of magnitude quicker than the solid state drive, in terms of both latency and throughput, which means the system should be sped up quite effectively when loading temporary files.
XFast LAN
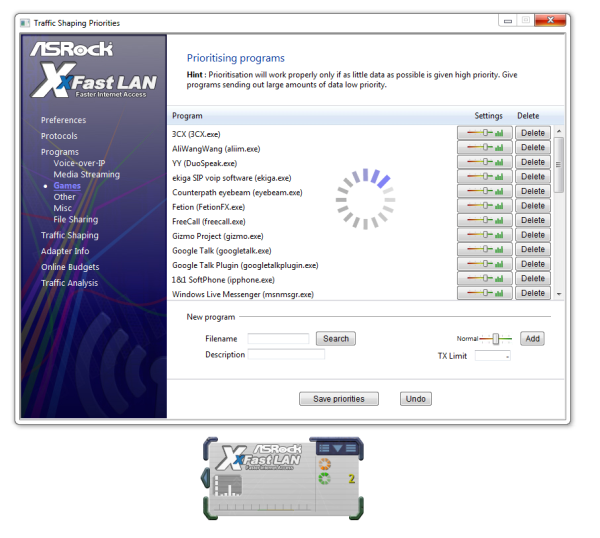
Licensed from cFosSpeed (in much the same way that ASUS' ROG GameFirst software is), ASRock have included a software driven networking utility as part of their software bundle.
This utility allows users to decide what has priority over the networking protocol. Should a gamer ever decide that he or she needs to heavily download while playing online games, this can be managed here. On the other hand, perhaps VoIP needs priority, or media streaming tools. XFast LAN also allows for port management of the network, as well as traffic analysis and monitoring.
XFast USB
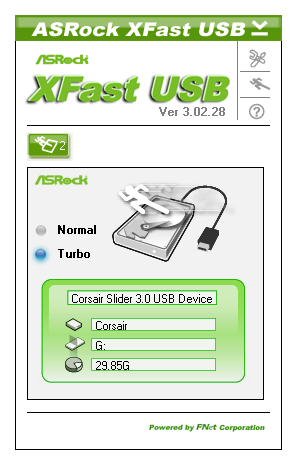
One feature that is crying out for Windows 8 is the overhaul of USB protocols. When Windows 7 had first come out, USB 3.0 was still in its infancy, and the standard set of USB commands were available. This is still true today with Intel's standard chipset drivers. One way of increasing USB throughput is to disregard latency, using Bulk Only Transfers (BOT). This is what XFast USB does - it overrides the USB driver in order to use its own commands. The stage above BOT is UASP, which will feature by default in Windows 8 with appropriate hardware. But for now, ASRock are giving XFast USB on a port-by-port basis, working on both USB 2.0 and USB 3.0 for a single device at a time. In our testing, it definitely speeds up the peak transfer rate, saving 20% time on our USB transfer test.
ASRock Z77 Extreme6 In The Box
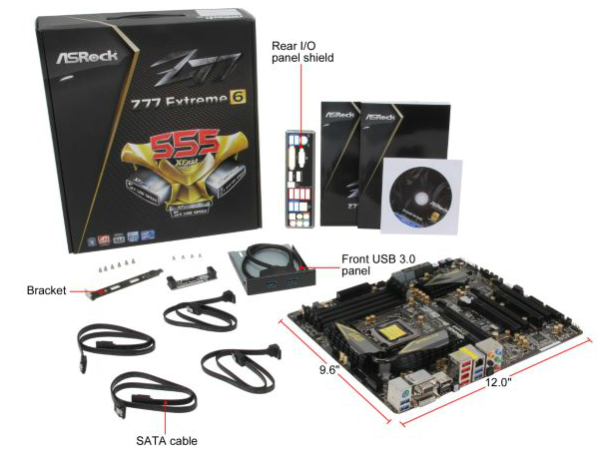
ASRock boxes seem to flip-flop between being very good and not that good. The appeal inside the box should outweigh the assumed contents given the price - if you can tool up a $100 motherboard package with what we would assume a $200 package would contain then you are in the clear.
Rear IO Panel
Quick Installation Guide
Software Setup Guide
Driver CD
Four SATA Cables
3-slot fixed SLI Bridge
Front USB 3.0 Panel + SSD Holder
One jewel in ASRock's crown is the smart USB front panels they stick in their box. The first board I ever reviewed for P67, the ASRock P67 Extreme4, came with it in a very well priced package. The Z77 Extreme6 comes in more expensive than that board, so by default we should expect it here, and we do (which is a good thing). Even though very few other manufacturers have it, what other manufacturers do have often is a full complement of SATA cables - despite having 8 SATA ports on board ASRock choose only to put four cables in the box.
Voltage Readings
After my first publication of OCCT voltage readings, a few readers responded with a more in-depth reasoning behind some of the results we were seeing. With this in mind, I would like to re-describe what we are doing with this test, and how it comes about.
Much of what an enthusiast overclocker does is monitor CPU temperature and voltage. Whatever settings a user places in the BIOS or OS is at the mercy of the motherboard - in terms of actually setting the values and reporting the values back. As an enthusiast, we have to rely on what readings we get back, and hope that motherboard manufacturers are being honest with their readings.
Take CPU voltage. What we as a user see in CPU-Z or OCCT is a time-averaged value that hides voltage ripple (if any) for power delivery. It is very easy for a motherboard manufacturer to hide this value, or to disregard slight deviations and report a constant value to the user. The CPU voltage reading can be taken at a variety of places on the power plane, which can vary between motherboards and manufacturers, meaning that each reading is essentially not comparable with the other. Nevertheless, as an enthusiast, we will constantly compare value A with value B.
Whether or not I can achieve 4.7 GHz with 1.175 volts on a particular board is inconsequential - your motherboard may perhaps produce the same result with a reading at 1.200 volts. The only way to test the actual value is with consistent methodology is via an oscilloscope connected to similar points on each board. This may sound like taking an OCCT reading is therefore redundant.
However, motherboards have settings relating to load line calibration. As load is applied to the CPU, the voltage across the processor decreases (VDroop). Load Line calibration essentially attempts to control this level of droop, by increasing voltage when voltage drops are detected away from a fixed value. Manufacturers have different ideas on how to modify LLC with respect to load, or whether the level of modification should be controlled by the user. Some manufacturers offer the option at a variety of levels, such that overclockers can be sure of the applied setting (even if it increases peak voltage, as explained by AnandTech in 2007).
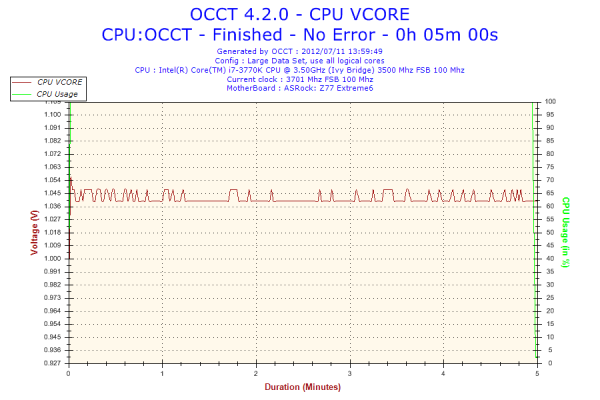
By doing a full load OCCT test, we are essentially determining both how aggressive the motherboard is reporting the CPU voltage under load and how aggressive load line calibration is performing (from the point of view of the user without an oscilloscope or DVM). If someone has one of the motherboards we have tested and you have a different one, variations in load voltage should describe the offset you may require for overclock comparisons.
| Reported Load Voltage / V | |
| ASRock Fatal1ty Z77 Professional | 0.956 |
| ASRock Z77 Extreme4 | 1.050-1.058 |
| ASRock Z77 Extreme6 | 1.040-1.048 |
| ASUS P8Z77-V Deluxe | 1.085 |
| ASUS P8Z77-V Pro | 1.090 |
| Gigabyte Z77X-UD3H | 1.067 |
| MSI Z77A-GD65 | 1.020 |
Overclocking
Note: Ivy Bridge does not overclock like Sandy Bridge. For a detailed report on the effect of voltage on Ivy Bridge (and thus temperatures and power draw), please read Undervolting and Overclocking on Ivy Bridge.
Our standard overclocking methodology is as follows. For automatic overclocks options, they are selected and tested for stability with PovRay and OCCT to simulate high-end workloads and catch any immediate causes for memory or CPU errors.
For manual overclocks, based on the information gathered from previous testing, starts off at a nominal voltage and CPU multiplier, and the multiplier is increased until the stability tests are failed. The CPU voltage is increased gradually until the stability tests are passed, and the process repeated until the motherboard reduces the multiplier automatically (due to safety protocol) or the CPU temperature reaches a stupidly high level (100ºC+).
Our test bed is not in a case, which should push overclocks higher with fresher (cooler) air. We also are using Intel's All-in-one Liquid Cooler with its stock fan. This is a 120mm radiator liquid cooler, designed to mimic a medium-to-high end air cooler.
Automatic Overclock:
Options for automatic overclocking are found in the BIOS. We have the main option, 'Advanced Turbo 30' which implements a 4.7 GHz overclock, and a second option 'Optimized CPU OC' that gives a series of options from 4.0 GHz to 4.8 GHz in 200 MHz increments.
Advanced Turbo 30 sets the BIOS to give 4.7 GHz to all cores at load. The setting enables PLL Overvoltage, and applies the following settings:
CPU Voltage: +0.085 volts
CPU Load Line Calibration: Level 1
iGPU Voltage: +0.120 volts
iGPU Load Line Calibration: Level 2
With these settings, the OS reported a voltage at load of 1.280 volts. Temperatures were very high, showing a peak temperature of 97ºC during PovRay and 98ºC during OCCT. It should be noted that the VRM heatsinks were barely warm to the touch.
For the Optimized CPU OC, the following results were obtained:
At the 4.0 GHz setting, the BIOS was set to 40x multiplier on all cores, CPU voltage set to Auto and LLC was set to Auto. In the OS, it showed 1.096 volts at full CPU load, giving maximum temperatures of 65ºC during PovRay and 66ºC during OCCT.
At the 4.2 GHz setting, the BIOS was set to 42x multiplier on all cores, CPU voltage set to Auto and LLC was set to Auto. In the OS, it showed 1.096 volts at full CPU load, giving maximum temperatures of 67ºC during PovRay and 68ºC during OCCT.
At the 4.4 GHz setting, the BIOS was set to 44x multiplier on all cores, CPU voltage set to Auto and LLC was set to Auto. In the OS, it showed 1.096 volts at full CPU load, giving maximum temperatures of 68ºC during PovRay and 70ºC during OCCT.
At the 4.6 GHz setting, the BIOS was set to 46x multiplier on all cores, CPU voltage set to Auto and LLC was set to Level 1. In the OS, it showed 1.192 volts at full CPU load, giving maximum temperatures of 80ºC during PovRay and 82ºC during OCCT.
At the 4.8 GHz setting, the BIOS was set to 48x multiplier on all cores, CPU voltage set to 1.240 volts fixed and LLC was set to Level 1. In the OS, it showed 1.248 volts at full CPU load, giving maximum temperatures of 93ºC during PovRay and 96ºC during OCCT.
Manual Overclock:
For the manual overclock, given the results seen in the automatic overclocking, we started at 1.100 volts on the CPU and a 45x multiplier.
At the 45x multiplier and 1.100 volts, the computer failed to load Windows correctly. We subsequently adjusted the LLC from Auto to Level 1, which caused a successful boot and was stable during testing. The following results were achieved.
For 4.5 GHz, the minimum CPU voltage stable set in the BIOS was at 1.100 volts, and the CPU multiplier to 45x. This was stable in the OS, showing 1.096 volts at load and giving peak temperatures of 69ºC during PovRay and 70ºC during OCCT.
For 4.6 GHz, the minimum CPU voltage stable set in the BIOS was at 1.125 volts, and the CPU multiplier to 46x. This was stable in the OS, showing 1.128 volts at load and giving peak temperatures of 73ºC during PovRay and 75ºC during OCCT.
For 4.7 GHz, the minimum CPU voltage stable set in the BIOS was at 1.175 volts, and the CPU multiplier to 47x. This was stable in the OS, showing 1.160 volts at load and giving peak temperatures of 81ºC during PovRay and 82ºC during OCCT.
For 4.8 GHz, the minimum CPU voltage stable set in the BIOS was at 1.250 volts, and the CPU multiplier to 48x. This was stable in the OS, showing 1.254 volts at load and giving peak temperatures of 94ºC during PovRay and 95ºC during OCCT.
For 4.9 GHz, we were unable to find a minimum stable voltage before hitting 100ºC during testing. At 1.300 volts, the system reached 100ºC during PovRay and still crashed the system.
Test Setup
| Processor |
Intel Core i7-3770K ES 4 Cores, 8 Threads, 3.5 GHz (3.9 GHz Turbo) |
| Motherboards |
ASRock Z77 Extreme4 ASUS P8Z77-V Pro Gigabyte GA-Z77X-UD3H MSI Z77A-GD65 ASUS P8Z77-V Deluxe ASRock Fatal1ty Z77 Professional Gigabyte GA-Z77MX-UD3H ASRock Z77 Extreme6 |
| Cooling | Intel All-in-One Liquid Cooler |
| Power Supply | OCZ 1250W Gold ZX Series |
| Memory |
GSkill RipjawsZ 4x4 GB DDR3-2400 9-11-11 Kit GSkill TridentX 2x4 GB DDR3-2666 11-13-13 Kit |
| Memory Settings | XMP (2400 9-11-11) |
| Video Cards |
ASUS HD7970 3GB ECS GTX 580 1536MB |
| Video Drivers |
Catalyst 12.3 NVIDIA Drivers 296.10 WHQL |
| Hard Drive | Micron RealSSD C300 256GB |
| Optical Drive | LG GH22NS50 |
| Case | Open Test Bed - CoolerMaster Lab V1.0 |
| Operating System | Windows 7 64-bit |
| SATA Testing | Micron RealSSD C300 256GB |
| USB 2/3 Testing | OCZ Vertex 3 240GB with SATA->USB Adaptor |
Power Consumption
Power consumption was tested on the system as a whole with a wall meter connected to the OCZ 1250W power supply, while in a dual 7970 GPU configuration. This power supply is Gold rated, and as I am in the UK on a 230-240 V supply, leads to ~75% efficiency > 50W, and 90%+ efficiency at 250W, which is suitable for both idle and multi-GPU loading. This method of power reading allows us to compare the power management of the UEFI and the board to supply components with power under load, and includes typical PSU losses due to efficiency. These are the real world values that consumers may expect from a typical system (minus the monitor) using this motherboard.
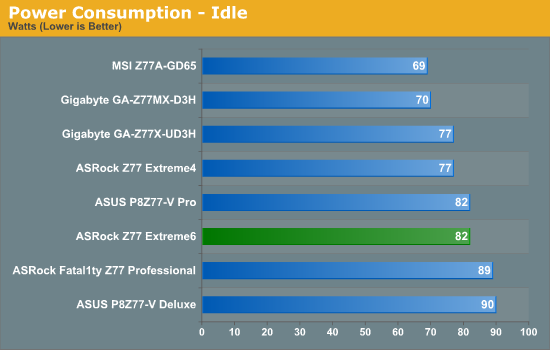
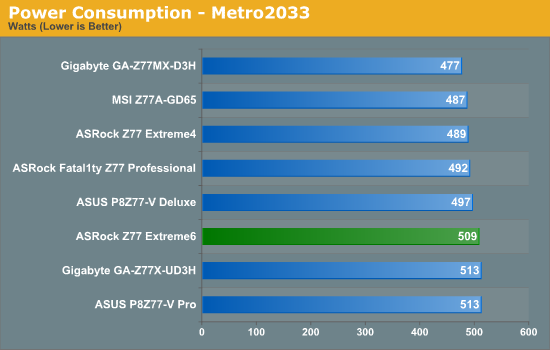
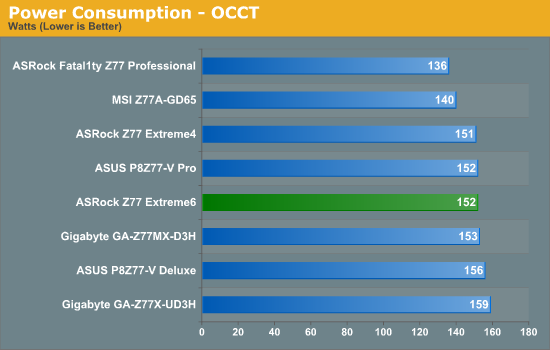
The Z77 Extreme6 does not seem to pull anything special out of the bag for power delivery, matching some of the more high performance models from ASUS and Gigabyte.
POST Time
Different motherboards have different POST sequences before an operating system is initialized. A lot of this is dependent on the board itself, and POST boot time is determined by the controllers on board (and the sequence of how those extras are organized). As part of our testing, we are now going to look at the POST Boot Time - this is the time from pressing the ON button on the computer to when Windows starts loading. (We discount Windows loading as it is highly variable given Windows specific features.) These results are subject to human error, so please allow +/- 1 second in these results.
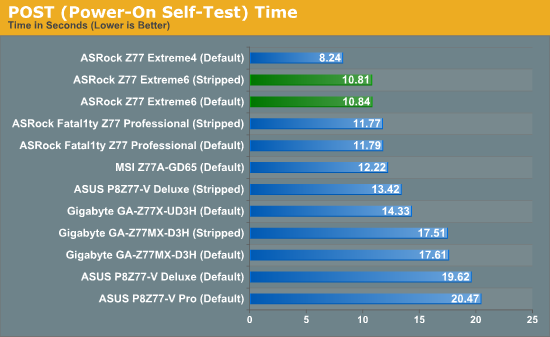
ASRock always does quite well on boot timings, taking all the top spots. It is assumed that ASRock has the least amount of 'check and verification' tools compared to their competitors, which can increase boot time.
Overclocks
Here at AnandTech we want to provide quick and easy ways to determine if a board is good for you (with in-depth analysis of course). So here is a quick round up of our overclocking results. Overclocks are tested for stability with PovRay and OCCT - while these may not be the most strenuous of stability tests, it does offer a quick check for memory errors under high load (and also balances testing time with getting the next board on for review!).
|
CPU Speed (MHz) |
Voltage (Volts) |
PovRay Peak Temp (ºC) |
OCCT Peak Temp (ºC) |
Notes | |
|
ASRock Fatal1ty Z77 Professional |
4700 | 1.200 | 89 | 89 | PLL Overvoltage enabled |
|
ASRock Z77 Extreme4 |
4700 | 1.175 | 86 | 86 | LLC Level 1 |
|
ASRock Z77 Extreme6 |
4700 | 1.175 | 81 | 82 | LLC Level 1 |
|
ASUS P8Z77-V Deluxe |
4700 | 1.225 | 89 | 84 | PLL Overvoltage enabled |
|
ASUS P8Z77-V Pro |
4700 | 1.200 | 83 | 86 | PLL Overvoltage enabled |
|
Gigabyte Z77X-UD3H |
4700 | 1.200 | 82 | 86 | LLC Extreme |
|
Gigabyte Z77MX-D3H |
4700 | 1.200 | 80 | 84 | LLC Extreme |
|
MSI Z77A-GD65 |
4700 | 1.250 | 90 | - | PLL Overvoltage enabled |
USB Speed
For this benchmark, we run CrystalDiskMark to determine the ideal sequential read and write speeds for the USB port using our 240 GB OCZ Vertex3 SSD with a SATA 6 Gbps to USB 3.0 converter. Then we transfer a set size of files from the SSD to the USB drive using DiskBench, which monitors the time taken to transfer. The files transferred are a 1.52 GB set of 2867 files across 320 folders – 95% of these files are small typical website files, and the rest (90% of the size) are the videos used in the Sorenson Squeeze test.
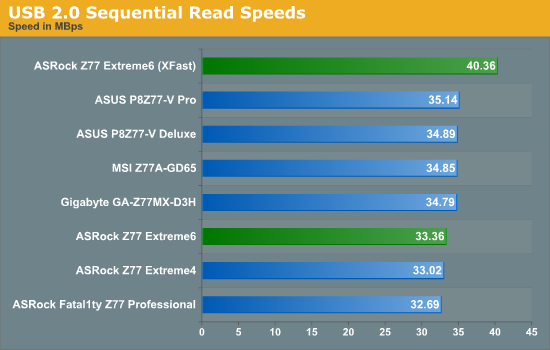
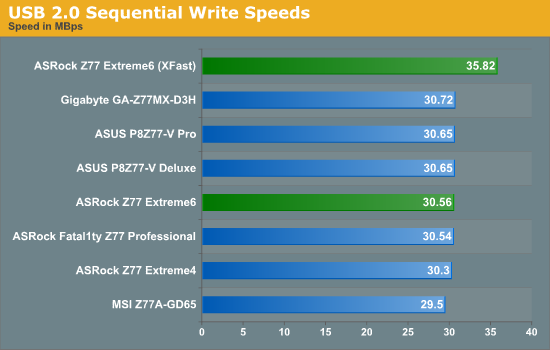
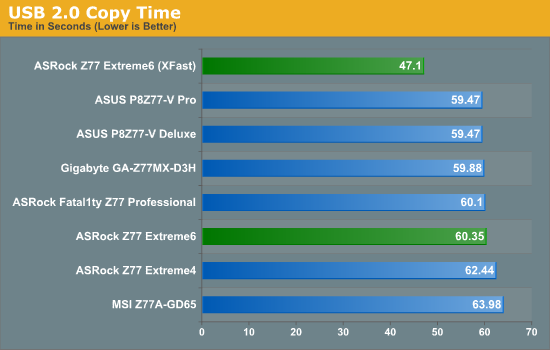
During USB 2.0 reading, it seems that ASRock have a slightly different setting enabled or have missed a trick with optimization - they are consistently 3% slower than any other manufacturer. This filters through a little to our real-world copy test. As always, the advantage of ASRock XFast makes that single USB port faster than any other standard USB port on the default protocols.
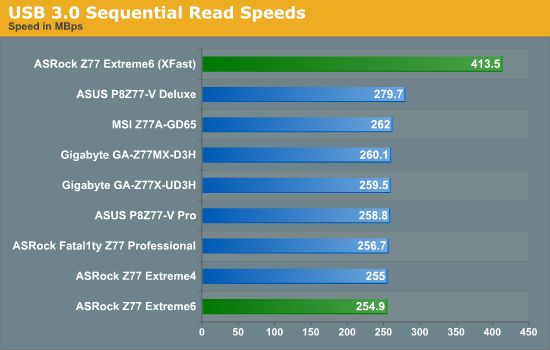
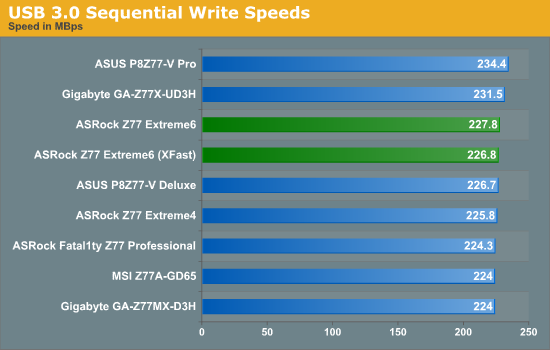
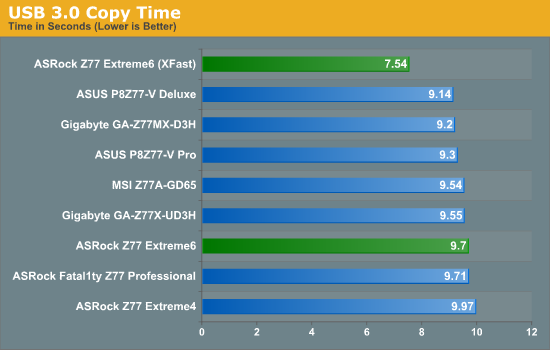
Similarly, with USB 3.0 on the chipset ports, the Z77 Extreme6 does nothing spectacular, joining the other ASRock boards at the bottom end of our copy test. Again, XFast pulls the ASRock above the default settings of other boards.
SATA Testing
We also use CrystalDiskMark for SATA port testing on a C300 drive. The sequential test (incompressible data) is run at the 5 x 1000 MB level. This test probes the efficiency of the data delivery system between the chipset and the drive, or in the case of additional SATA ports provided by a third party controller, the efficiency between the controller, the chipset and the drive.
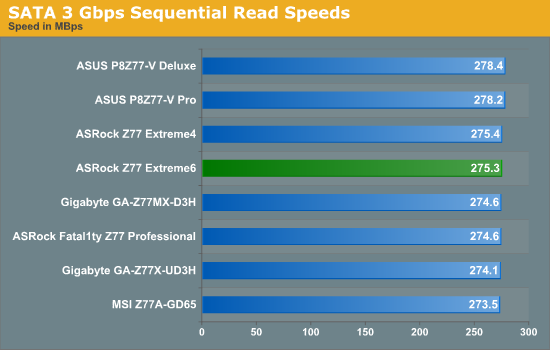
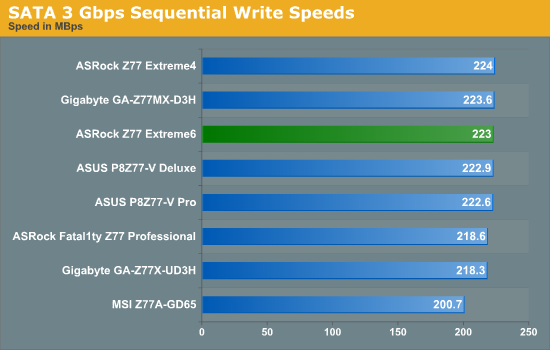
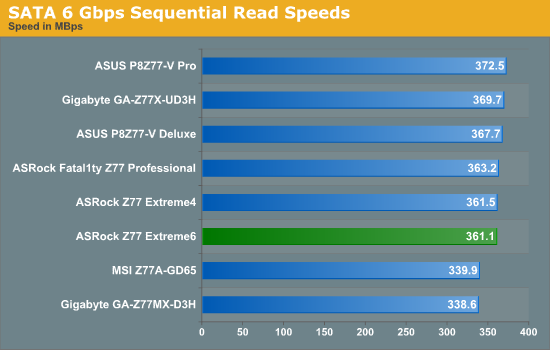
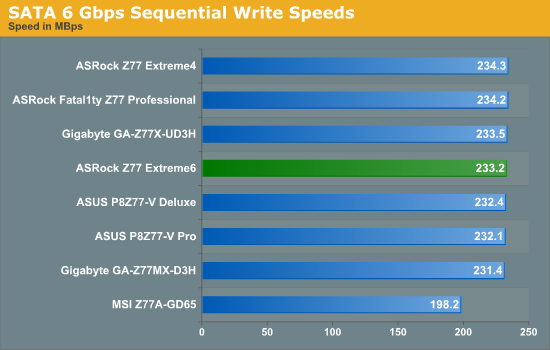
Nothing special for SATA ports, as it seems that the drive is our limiting factor.
DPC Latency
Deferred Procedure Call latency is a way in which Windows handles interrupt servicing. In order to wait for a processor to acknowledge the request, the system will queue all interrupt requests by priority. Critical interrupts will be handled as soon as possible, whereas lesser priority requests, such as audio, will be further down the line. So if the audio device requires data, it will have to wait until the request is processed before the buffer is filled. If the device drivers of higher priority components in a system are poorly implemented, this can cause delays in request scheduling and process time, resulting in an empty audio buffer – this leads to characteristic audible pauses, pops and clicks. Having a bigger buffer and correctly implemented system drivers obviously helps in this regard. The DPC latency checker measures how much time is processing DPCs from driver invocation – the lower the value will result in better audio transfer at smaller buffer sizes. Results are measured in microseconds and taken as the peak latency while cycling through a series of short HD videos - under 500 microseconds usually gets the green light, but the lower the better.
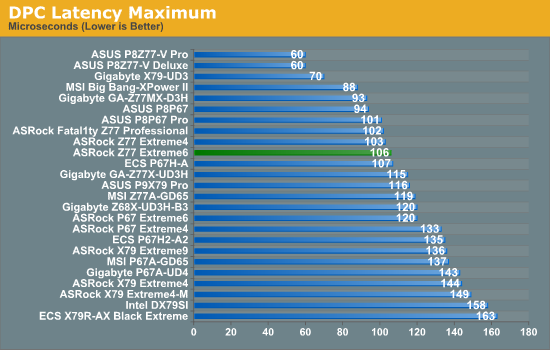
The ASRock Z77 Extreme6 does well in our DPC test, with only 106 microseconds. Anything over 500 is bad, and under 200 is good. Ivy Bridge and Z77 in this regard has set a new bar for other chipsets to follow.
3D Movement Algorithm Test
The algorithms in 3DPM employ both uniform random number generation or normal distribution random number generation, and vary in various amounts of trigonometric operations, conditional statements, generation and rejection, fused operations, etc. The benchmark runs through six algorithms for a specified number of particles and steps, and calculates the speed of each algorithm, then sums them all for a final score. This is an example of a real world situation that a computational scientist may find themselves in, rather than a pure synthetic benchmark. The benchmark is also parallel between particles simulated, and we test the single thread performance as well as the multi-threaded performance.
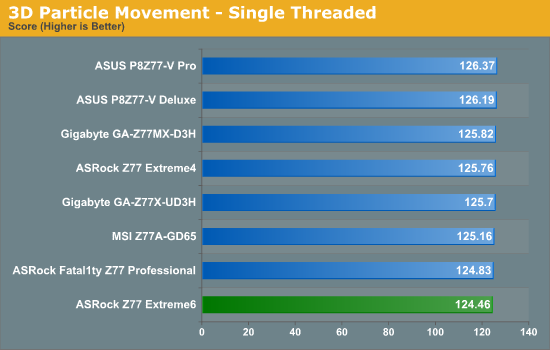
The Z77 Extreme6 unfortunately comes bottom of our 3DPM test in single threaded mode, almost 2% behind the leader.
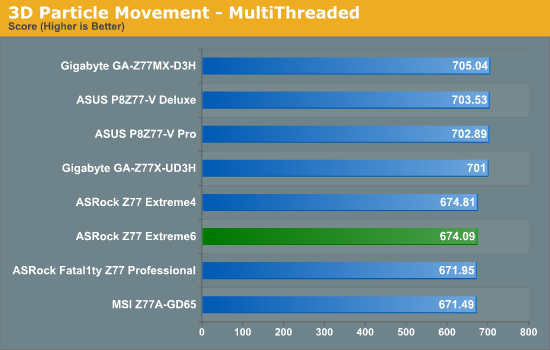
In our multithreaded 3DPM, the ASRock boards, due to their lack of MultiCore Enhancement, feature behind those that do have it. I have a feeling that this 'tweak' will become the norm on future chipsets so no motherboard is left behind on performance.
WinRAR x64 3.93 - link
With 64-bit WinRAR, we compress the set of files used in the USB speed tests. WinRAR x64 3.93 attempts to use multithreading when possible, and provides as a good test for when a system has variable threaded load. If a system has multiple speeds to invoke at different loading, the switching between those speeds will determine how well the system will do.
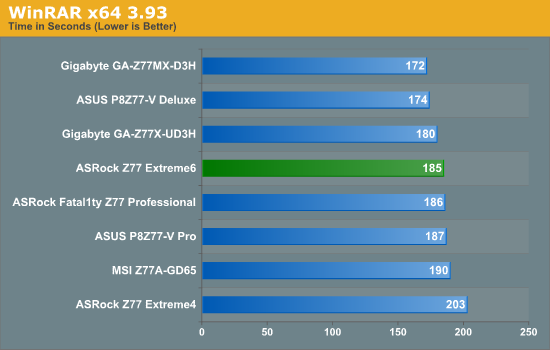
The ASRock Z77 Extreme6 does well in our WinRAR test, finishing in the middle of the pack - but still behind the ASUS and Gigabyte boards.
FastStone Image Viewer 4.2 - link
FastStone Image Viewer is a free piece of software I have been using for quite a few years now. It allows quick viewing of flat images, as well as resizing, changing color depth, adding simple text or simple filters. It also has a bulk image conversion tool, which we use here. The software currently operates only in single-thread mode, which should change in later versions of the software. For this test, we convert a series of 170 files, of various resolutions, dimensions and types (of a total size of 163MB), all to the .gif format of 640x480 dimensions.
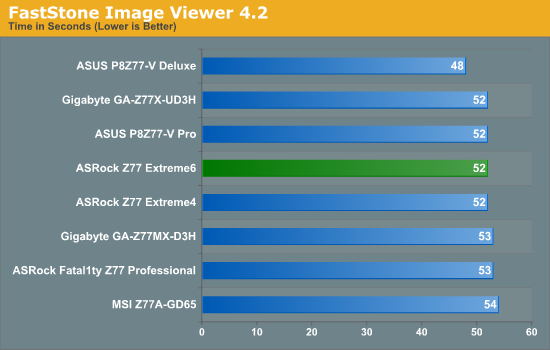
Not a lot to say here, with ASRock being on par with most of the other boards we have tested.
Xilisoft Video Converter
With XVC, users can convert any type of normal video to any compatible format for smartphones, tablets and other devices. By default, it uses all available threads on the system, and in the presence of appropriate graphics cards, can utilize CUDA for NVIDIA GPUs as well as AMD APP for AMD GPUs. For this test, we use a set of 32 HD videos, each lasting 30 seconds, and convert them from 1080p to an iPod H.264 video format using just the CPU. The time taken to convert these videos gives us our result.
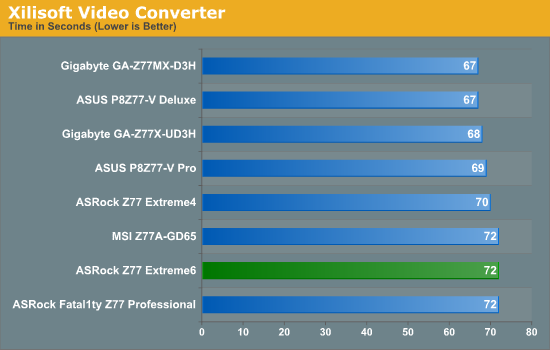
Xilisoft is another test that tells us how well a system responds to variable threaded loading. Unfortunately, in this regard, the Z77 Extreme6 lags behind some 5 seconds off the pace (~7.5%).
x264 HD Benchmark
The x264 HD Benchmark uses a common HD encoding tool to process an HD MPEG2 source at 1280x720 at 3963 Kbps. This test represents a standardized result which can be compared across other reviews, and is dependant on both CPU power and memory speed. The benchmark performs a 2-pass encode, and the results shown are the average of each pass performed four times.
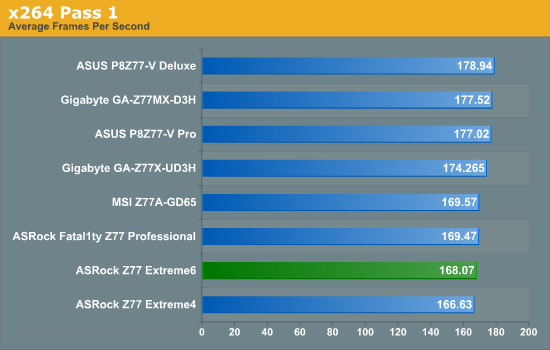
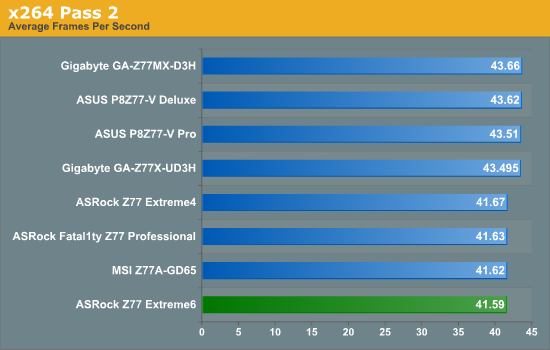
The ASRock Z77 Extreme6 also falls down in our x264 test, as the ASUS and Gigabyte boards have those extra MHz at fully threaded load.
A note about 3-way AMD
So far most of the Z77 motherboards we have tested had three full length PCIe slots - two from the CPU that can be x16/- or x8/x8, and a third that was limited to 4 PCIe 2.0 lanes from the chipset. By design, this final third slot should not be graphics compatible - with only four PCIe 2.0 lanes from the chipset, it would be slow as well.
ASRock bucks the trend with the Z77 Extreme6, and allows this third PCIe slot to accept a GPU:
Even though the Extreme6 is the only board we have tested tri-GPU so far, we will add the results here for completeness. Unfortunately, we only have three AMD GPUs, and were unable to test three NVIDIA GPUs.
Civilization V
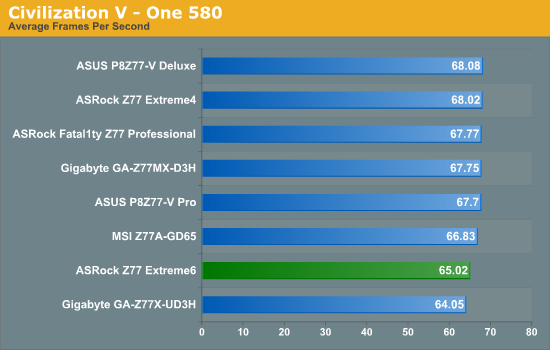
Civilization V is a strategy video game that utilizes a significant number of the latest GPU features and software advances. Using the in-game benchmark, we run Civilization V at 2560x1440 with full graphical settings, similar to Ryan in his GPU testing functionality. Results reported by the benchmark are the total number of frames in sixty seconds, which we normalize to frames per second.
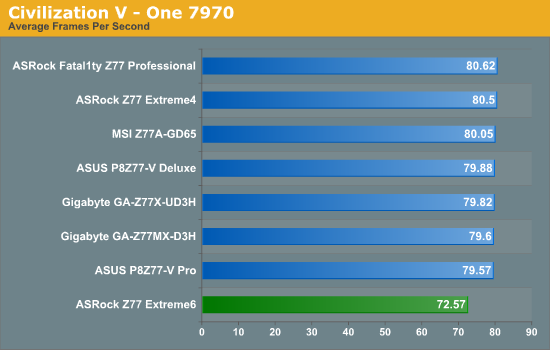
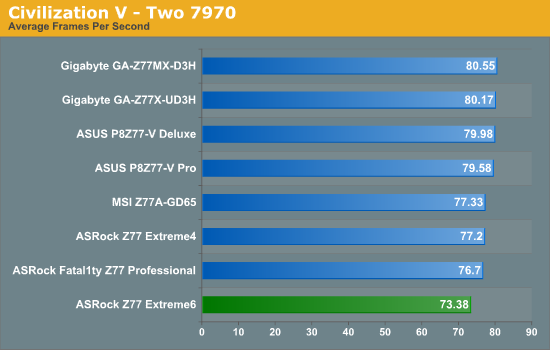
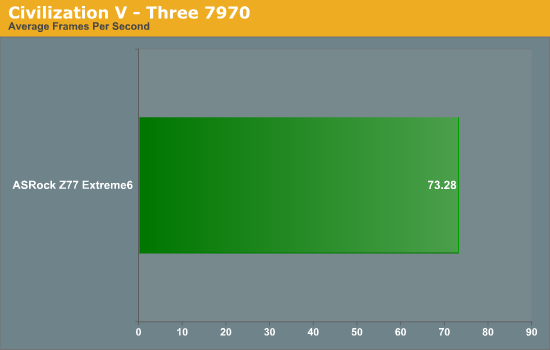
Strangely on Civilization V, the ASRock Z77 Extreme6 seems to not enjoy processing frames, coming bottom on both single and dual 7970 by a significant margin. However, the board is the only Z77 we have tested that will happily accept three GPUs.
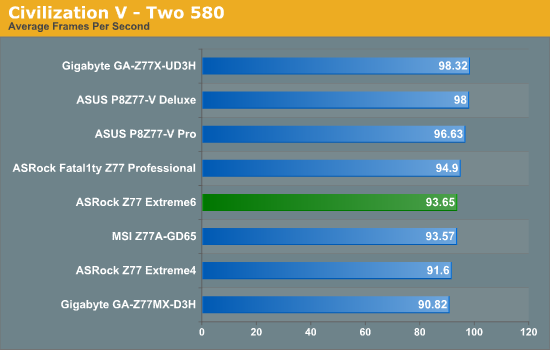
Again, with NVIDIA the board does not perform that well, especially when the other ASRock motherboards we have tested are reasonable.
Dirt 3
Dirt 3 is a rallying video game and the third in the Dirt series of the Colin McRae Rally series, developed and published by Codemasters. Using the in game benchmark, Dirt 3 is run at 2560x1440 with full graphical settings. Results are reported as the average frame rate across four runs.
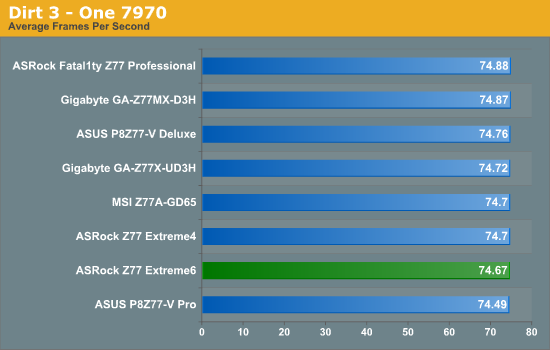
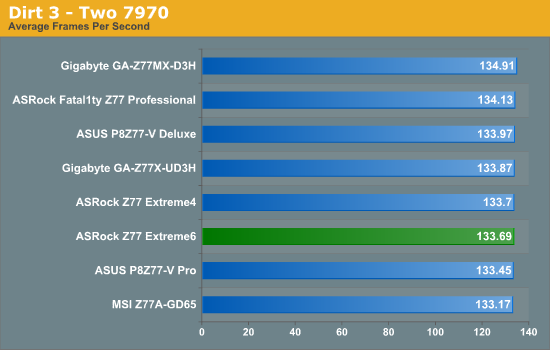
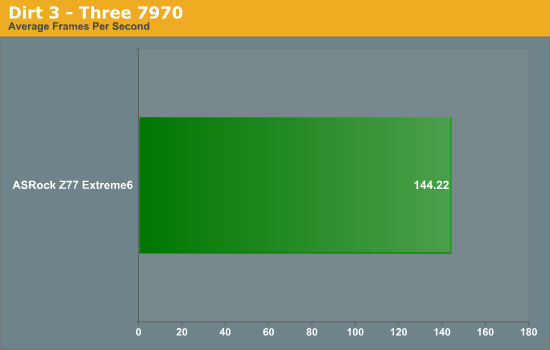
The ASRock Z77 Extreme6 does not light up the charts with Dirt3, but the differences between first and last are very small. It is interesting to note that the first GPU gives 74.67 FPS, the second GPU adds 59 FPS, and the third only adds 11 FPS. This is most likely due to the third GPU being limited to 4 PCIe 2.0 lanes.
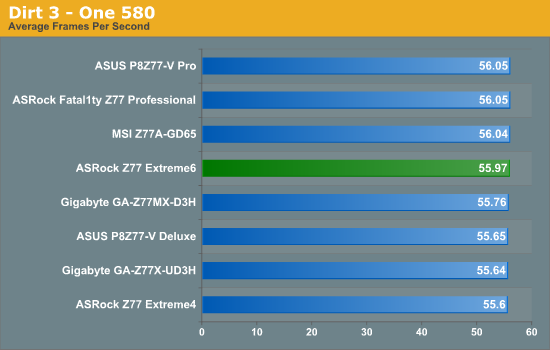
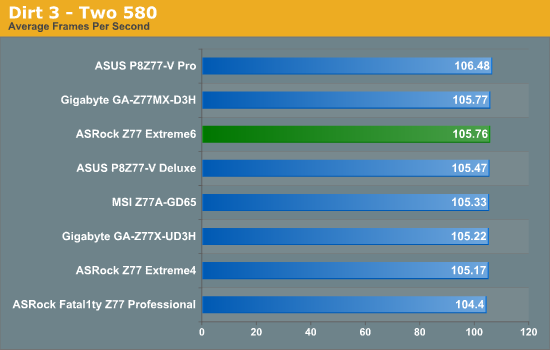
NVIDIA wise, the Extreme6 puts up more of a battle and ends up mid table, where less than 2 FPS separates first and last in dual GPU and 0.4 FPS for single GPU.
Metro2033
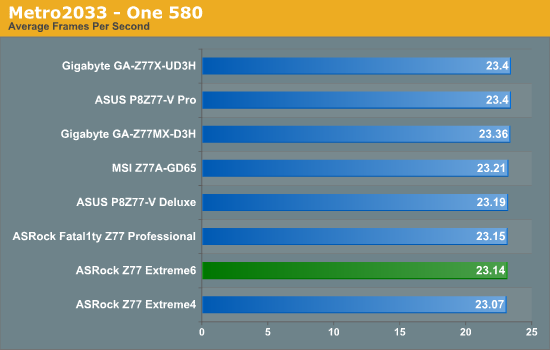
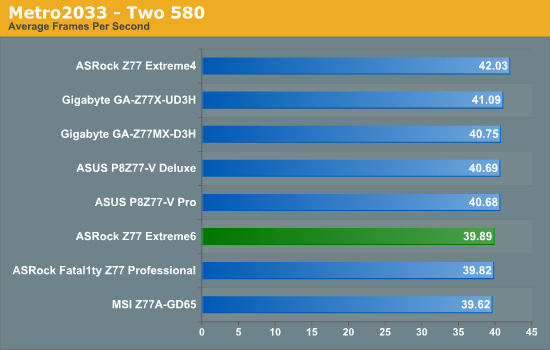
Metro2033 is a DX11 benchmark that challenges every system that tries to run it at any high-end settings. Developed by 4A Games and released in March 2010, we use the inbuilt DirectX 11 Frontline benchmark to test the hardware at 2560x1440 with full graphical settings. Results are given as the average frame rate from 4 runs.
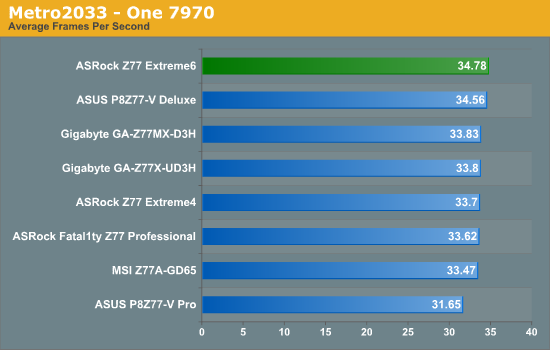
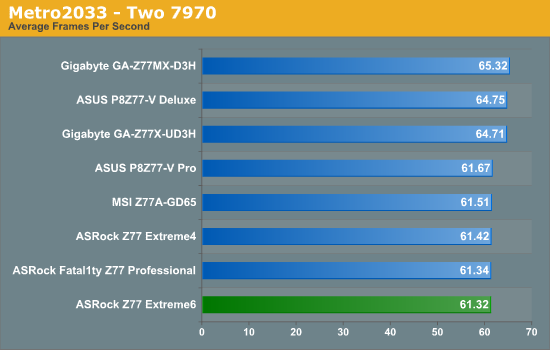
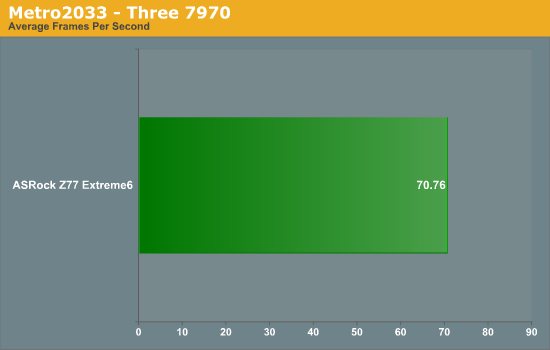
Surprisingly the Extreme6 does take the lead on one gaming benchmark - Metro2033 using a single 7970.
The ASRock Z77 Extreme6 looks like a good motherboard on paper. If we do direct comparisons to the Z77 Extreme4, we have more substantial heatsinks, a floppy port, the full array of video outputs and a third PCIe slot at the bottom powered from the chipset.
The board itself is slightly bigger than the Extreme4, because the Extreme4 was actually smaller-than-ATX. However, the extra real estate is costing another $35, and we are not getting anything in the way of performance that excels. A quick glance over our benchmark suite and you will notice that the Z77 Extreme6 just does not light up the charts. It is usually in the middle of the road, of even worse, at the bottom.
The main thing the Z77 Extreme6 has going for it is the overclocking. All of the auto overclocking options worked first time, and plugging in my normal overclocking technique gives us some of the best results we have ever had for 4.7 GHz. Nevertheless, I did experience issues in getting my memory kit (G.Skill DDR3-2400 9-11-11) to work properly at XMP. Another plus side is that we get that awesome USB 3.0 front bracket in the box which doubles as an SSD holder.
Software wise, we do get a nice selection of network management software as well as RAM-Disk tools for temporary files. The software needs to be all bundled together as much as possible to feel more streamlined to users, as well as pulling some of the features in the BIOS (Dehumidifier, Online Management Guard) out into the software.
The BIOS is well built and laid out appropriately. There is room to move with regards how graphical BIOS can capture the imagination of the artist, and I am told we should expect something better for the later chipsets due out this year.
Simply put, some motherboards are a joy to work with. Every corner you turn they give you a little bit more. Even if the differences to other motherboards are minor, often a little spark improves your experience. ASRock ideas such as Internet Flash and OMG are good, but their implementation needs to be refined. ASRock are on the road to becoming one of the top tier manufacturers and joining the ranks of ASUS and Gigabyte, but the Z77 Extreme6 is not it. It gives you a nice overclock that removes the performance issues at stock speeds, but I cannot find much to get excited about.

